By Cody Burkhart
We have all seen a baby peacefully lying asleep, its little “coos” filling the air. While you may have likely never paid attention to the breath patterns of a little one with specific intent, I bet your mind’s eye can remember this visual image: a tiny belly filling up like a carnival balloon with each inhalation. Pause a moment… are you breathing with your belly? Or is your chest and shoulders rising as the air filling your lungs presses your rib cage up and outward as its expands to make room? Not to burst your bubble… but that baby, you need to pay attention to what it’s teaching you. He or she has not, yet, gathered all the bad habits you have and their diaphragm is working like a dream. That’s right… the diaphragm:
“A dome-shaped, muscular partition separating the thorax from the abdomen in mammals. It plays a major role in breathing, as its contraction increases the volume of the thorax and so inflates the lungs.” –google definition
The diaphragm is one of those things that gets used an awful lot in conversations regarding the body and training because of that primary role in breathing. What I see/hear more times than not, however, is a clear misconception of how the diaphragm actually works and what ways we can develop it. The biggest issue becomes trying to wrap your mind around how the contraction helps to inflate your lungs.
Often I hear this: “When you engage the diaphragm, the muscle pulls down and you can get more air into your lungs.” This is both correct and incorrect because the mental image most people get is that you are just trying to engage the muscle to push down your organs in order to free up space in your thorax. The issue with this is that it turns the active scenario of the diaphragm into a somewhat passive lens. People begin to think that it’s like pushing a cubicle divider back: “the more I push it back, the more living space I have to enjoy the bliss of my work day.” While this helps people wrap their mind around the idea that activating the diaphragm can give them “more room” for more air… it takes away a concept of how the diaphragm works. It, instead, turns the diaphragm into a boring wall with places to hang pictures of your kid.
To clarify this concept, let’s relate your diaphragm to a syringe: simplistic in design, but beautiful in its application. Your body, like the syringe, takes advantage of natural laws to increase the amount of air it can pull in through a concept called Boyle’s Law. To explain this, replace every sliding wall or divider image you have had in the past with the image of a syringe. A syringe has a very unique difference to that of a wall… it has a seal between the outer diameter of the plunger and the inside diameter of the tube. This seal prevents air, fluid, etc. from leaking out the bottom of the tube. Now, think about that syringe pulling fluid out of a vial… retraction of the plunger not only increases “space” for the fluid to fill, but when we pull the plunger back it actually pulls the liquid into the syringe. This isn’t magic but, rather, follows a simple concept: Boyle’s Law.
Mathematically, this law is written as P1V1 = P2V2.
Where P is pressure, V is volume.
In words, it means that there is an inverse relationship of pressure and volume of a gas in a closed system.
Essentially, Boyle’s Law means that if I don’t have any holes in my syringe (closed system), as I make more room in the syringe (pulling the plunger aka “moving the wall”) the pressure inside the syringe changes in the exact opposite fashion. So, if the volume goes up (more space), then the pressure goes down. Due to the reduction in pressure inside the syringe, our system of the vial and the syringe wants to try and balance out its own Boyle’s Law: the two elements seek to balance out the pressure. The result? Liquid flows from the vial into the syringe to reduce the difference in pressure. This is the same process for air movement that is, basically, vacuumed into our thoracic/abdominal space and lungs via our diaphragm.
To grasp the raw impact of this effect, imagine how much work you would have to do in order to push liquid into the syringe if the plunger couldn’t move. An incredible force would be needed and only a little bit of the plastic syringe would flex, which means a ton force over a short distance aka “a metric ton of work.” But on the other side of the token, how easy is it to pull the plunger back in a syringe… I bet you can do it one handed? Relate this back to your diaphragm, connected like a seal to your inner cavity… The principle is that you get more air movement for less work by properly using the diaphragm to breath, as opposed to forcefully expanding your rib cage trying to huff and puff like the big bad wolf with your lungs only.
This is the beauty in the design… your body takes advantage of natural laws to increase the amount of air it can pull in. Now we can transfer more total air across our lungs’ capillaries on the exhalation, which directly correlates to removing more waste and CO2 from our bodies with every breath. (More to come on this is a connected post, but for now a taste…)
Not only do you provide yourself with more oxygen to, say, stay aerobic under workload (keeping yourself from becoming anaerobic and burning your glycogen stores down like a 5-alarm fire), but you are also promoting recovery by eliminating toxins generated as waste due to your body’s general workload. In fact, I’m sure there are countless infographics that proudly proclaim the following: approximately 70% of your waste is not disposed of via your porcelain throne, but through breathing. The diaphragm isn’t just a wall – some partitioned space that you move to make more room for activities – it’s oxygenating your body, clearing waste, and all with very little energy required as your smart biology games with the rules of physics.
So what to do? Well… now that we have the training wheels off, let’s go run with scissors and see where we find ourselves. It’s time for the first experiment…
If I strengthen the contractile function of the diaphragm, do I become super human or should we just let sleeping babes lie?
This is where you come in, this is the whole “getting dirty” part. The thing about developing strength in the diaphragm, and adequate control of its functioning to a state where it becomes instinctual, is not a game of seconds. It’s a game of deep practice, the kind Coyle can get behind. You can dive deep into the billions of pages out on the web and find some really great information, and I encourage you to do so, but to get you started – and to introduce the first experiment we will be discussing – I want to give you some concepts to try out and test on yourself; help you become that n = 1.
Without further ado, here are three very different methods to work on your diaphragm control (all of which I have experimented with, in depth):
1. Sandbag breathing and Yoga breathing

This basic breathing style known as sandbag breathing is all about allowing your body (beginning in a supine position) to return to a natural state, like the sleeping baby from earlier, by having you focus on softening your abdomen and letting your belly (not your chest) rise and fall with your breaths. To make use of this skill further, is to start applying the same feel of breath you receive from the sandbag practice in basic yoga positions. Don’t go out the gates with an intense balance posture; instead, work your way up through half and full lotus to warrior stances and squat positions. The entire goal is to patiently let your body relax to engage the diaphragmatic breath in any position you face. This is not an entire solution, however, because often we need core engagement in our positions to hold them. So… if you get extra frisky, go check out the fiesta over at diaphragmatic rib cage breathing next.
2. Core development work

The diaphragm is really just one part to the four walls that the core built. In developing each of them we create a stronger foundation for use of the diaphragm. Maybe you have already spent lots of time developing breathing styles, but you still struggle with overcoming chest breathing because you do not have the stability of a strong core to maintain position and movement of the diaphragm. For example, if I collapse forward in a squat, I eliminate the ability for my diaphragm to move; all I am left with is my lungs to expand my rib cage. To correct this, spend time applying work and training of not just your diaphragm, but also of your Transversus Abdominis (The Corset), Pelvic Floor Muscle (Yes, men you have one too), and Multifidi (The Back Support). For more information, and videos from back in my youthful years, to apply, check out a recent blog I made for @3Fu3l here.

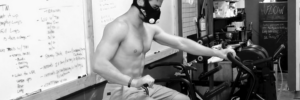
Fair warning and outright disclaimer, yes we sell these bad boys on our site and work with them, but it doesn’t change the fact that this last suggestion for diaphragm training self-application is worth its weight. The TM turns normal inhalations into struggles of will and focus. Whether that happens to you at the 3k feet or 18k feet settings isn’t the point; the goal is to strengthen the diaphragm and generate neurological timing. As soon as you have to fight to take in air, your body overrides your desire to chest heave for the larger desire of getting its oxygen levels back to normal. To do so, it, literally, forces you to start taking the biological brilliance to heart and pull with your diaphragm. Easy applications include wearing the mask as part of your warm up routine or in the initial :15-:30 seconds of recovery from a sprint interval or lift. In the former case, you tell your body to focus on using the diaphragm first to slowly create an instinctual response throughout the rest of the training session. In the latter, well… let’s leave some mystery and simply state that if you slam a Training Mask onto your muzzle after your next 400m sprint… you are going to learn some things about the beauty of breathing with your diaphragm.
That gives you a good place to start. A little bucket of concepts to beta test in your gym space and home laboratories. Don’t look at these as “The best 3 exercises to be an awesome breather” but rather as honest test cases. Apply one, compare how you feel throughout the process of a few weeks, and assess it against the rest. Combine what works best and throw the rest away. There isn’t enough time in a day to do everything. Become surgically honest with yourself. As Bruce Lee states:
“Adapt what is useful, reject what is useless, and add what is specifically your own.”
This blog isn’t about being told what to do… it’s about giving you enough opportunities to experience yourself, and your interaction with the environment. Tell your own story and experience below.
*On the road or multitasking? Listen to the audio version of the N=1 Blog.

No Comments